
How Contamination Travels Through Your Hydraulic System
Before we get into service intervals, it helps to see where dirt actually does its damage. The schematic below follows one speck of grit from the moment it slips past a worn seal to the moment it scars the pump.
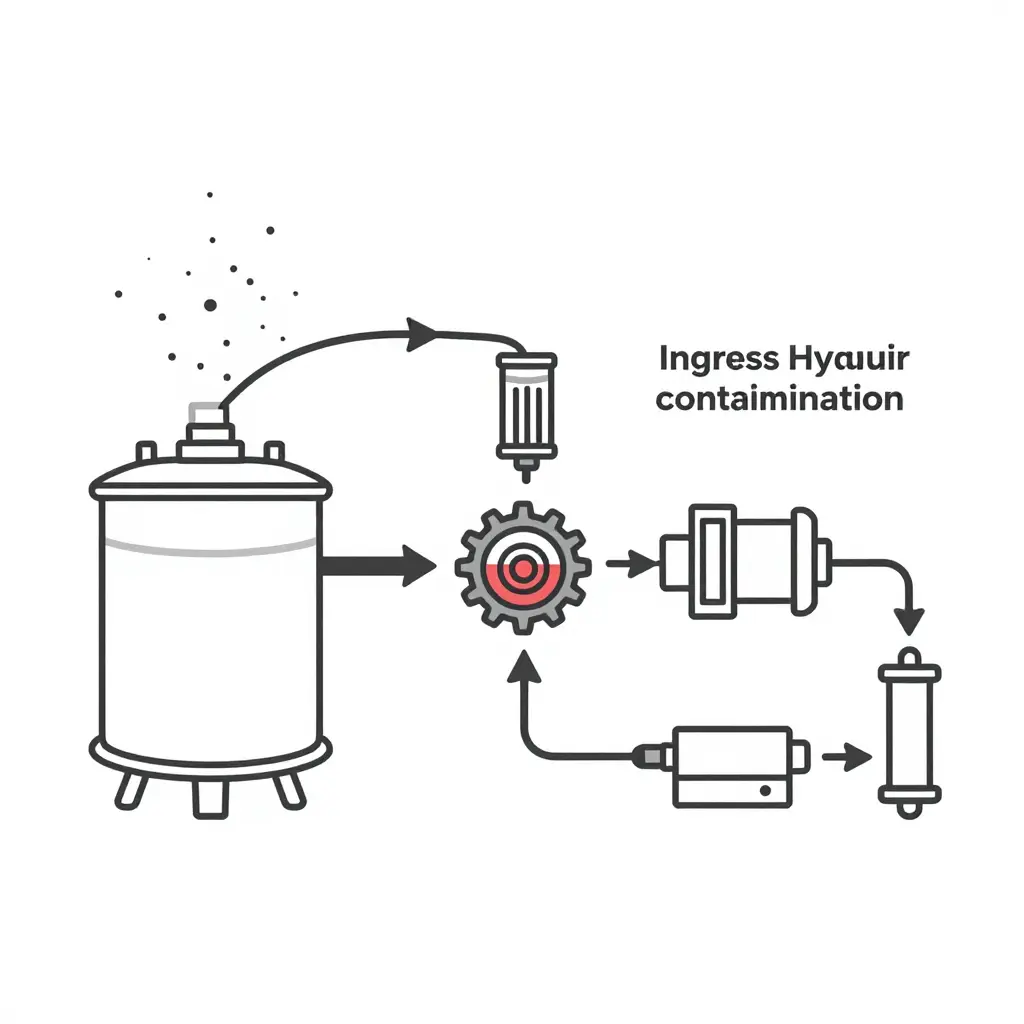
Follow the arrows from left to right:
- Ingress point – airborne dust, debris, or metal shavings enter through a loose fitting, a damaged breather, or a fill cap left open during service.
- Reservoir – particles settle into the fluid and circulate freely. Every pass through the system breaks more material loose, so the count keeps climbing.
- Filter – a healthy element traps most of them. A clogged or bypassed filter lets everything straight through, and that is where many failure stories begin.
- Hydraulic pump – the red zone. Abrasive particles scour the internal surfaces, widening clearances and dropping pressure output.
- Valves and cylinders – contaminated fluid carries the debris downstream, which shows up as sticking spools, drifting cylinders, and erratic digging performance.
The pump rarely fails on its own. It is usually the last component to complain about a problem that started upstream, and that problem almost always comes down to how closely you stick to your service intervals.
Mapping Contamination to Failure: The Pump Failure Mode Comparison Table
A hydraulic pump rarely fails overnight. Almost always, one contaminant attacks one component until the machine gives up. The table below lines up the symptoms you see in the field with the contamination behind them and the service windows that keep them in check. Use it as a reference when you build out your preventive maintenance schedule for excavator hydraulic systems.
Table 1: Excavator hydraulic pump failure modes mapped to contaminant sources and recommended preventive maintenance schedule intervals.
| Failure Mode | Primary Contaminant Source | Typical Service Interval | Warning Indicator |
|---|---|---|---|
| Cylinder bore scoring | Abrasive silica and dirt drawn through the reservoir breather or worn rod seals | Inspect every 500 hrs; fluid analysis every 250 hrs | Rising oil temperature, glitter in the filter, falling flow rate |
| Valve plate erosion | Water or moisture condensation combined with fine silt particles | Full fluid change every 1,000-2,000 hrs | Gradual pressure loss, erratic actuator speed, cavitation noise |
| Bearing wear | Hard metal debris shed from fatigued gears, splines, or other rotating parts | Vibration and play check every 500 hrs | Audible growl or whine, axial shaft play, hot bearing housing |
| Seal degradation | Oxidized oil, chemical additives, and sustained heat exposure | Seal inspection and replacement every 2,000 hrs | External weeping leaks, air ingress, foaming in the reservoir |
| Filter bypass | Overdue filter changes leaving sludge and varnish to accumulate | Filter replacement every 250-500 hrs | Illuminated bypass indicator, low system pressure, dark contaminated fluid |
| Slipper and retainer wear | Varnish and oxidation deposits formed by degraded old oil | Internal inspection every 1,000-2,000 hrs | Reduced volumetric efficiency, sluggish response under load |
| Piston shoe seizure | Particulate ingression during breather or quick-coupler servicing | Particle count check every 250 hrs | Sudden pressure spikes, metallic debris on the magnetic drain plug |
How to read the table
Filter and breather neglect sits behind almost every row. Contaminant sources feed on skipped service windows, so treat the “typical service interval” column as a set of deadlines. Miss them and a cheap filter or a few liters of fresh oil turns into a five-figure pump rebuild.
Read the warning indicator column first. Those are the signals that appear while the repair is still affordable: rising temperatures, filter glitter, a foaming reservoir. Each one points at a specific failure mode that is already underway.
Turning intervals into action
- Log operating hours the moment a pump is installed, not when a fault appears.
- Pair every filter change with a fluid sample so wear metals reveal which row of the table applies to your machine.
- Track water content separately from particle counts; moisture erodes valve plates long before grit does.
- Tie seal and bearing inspections to the same downtime window to cut labor overlap.
- Store replacement oil and filters sealed and clean, because a contaminated spare defeats the whole schedule.
Component Degradation: How Contamination Wears Pumps Down
Contamination doesn’t destroy a pump overnight. It grinds it down, one dirty service interval at a time.
Every time dust, metal filings, or degraded seal material gets past a filter, it enters the circuit as abrasive particles. Those hard fragments ride along with the oil and scrape across the tight clearances between the piston, cylinder bore, and valve plate. The scratches widen tolerances, score surfaces, and steadily cost the pump its ability to build pressure.
Two things speed the damage up. The first is erosion: fast-moving fluid carries grit that chips away at internal edges like a sandblaster. The second is cavitation, which starts when entrained air forms vapor pockets that collapse against metal, pit the surface, and shed still more debris into the system. Water works differently. Dissolved water lowers the oil’s lubricity and encourages corrosion.
The chain from there is predictable. Rising particle counts increase internal leakage. Leakage forces the pump to work harder, so oil temperature climbs. Hot, thin oil lubricates poorly and oxidizes faster, generating sludge that adds to the contamination. Efficiency falls, output drops, and the pump runs hotter still, until it seizes or fails outright.
Catching this early with routine oil analysis is what separates a $200 filter change from a $15,000 pump replacement.
What the Data Says: Longer Service Intervals, Dirtier Oil, More Failures
The chart below tracks two things across rising service intervals: the contamination load in the hydraulic oil, measured as particles per milliliter larger than 4 µm, and the reported pump failure rate for excavators running those same intervals.
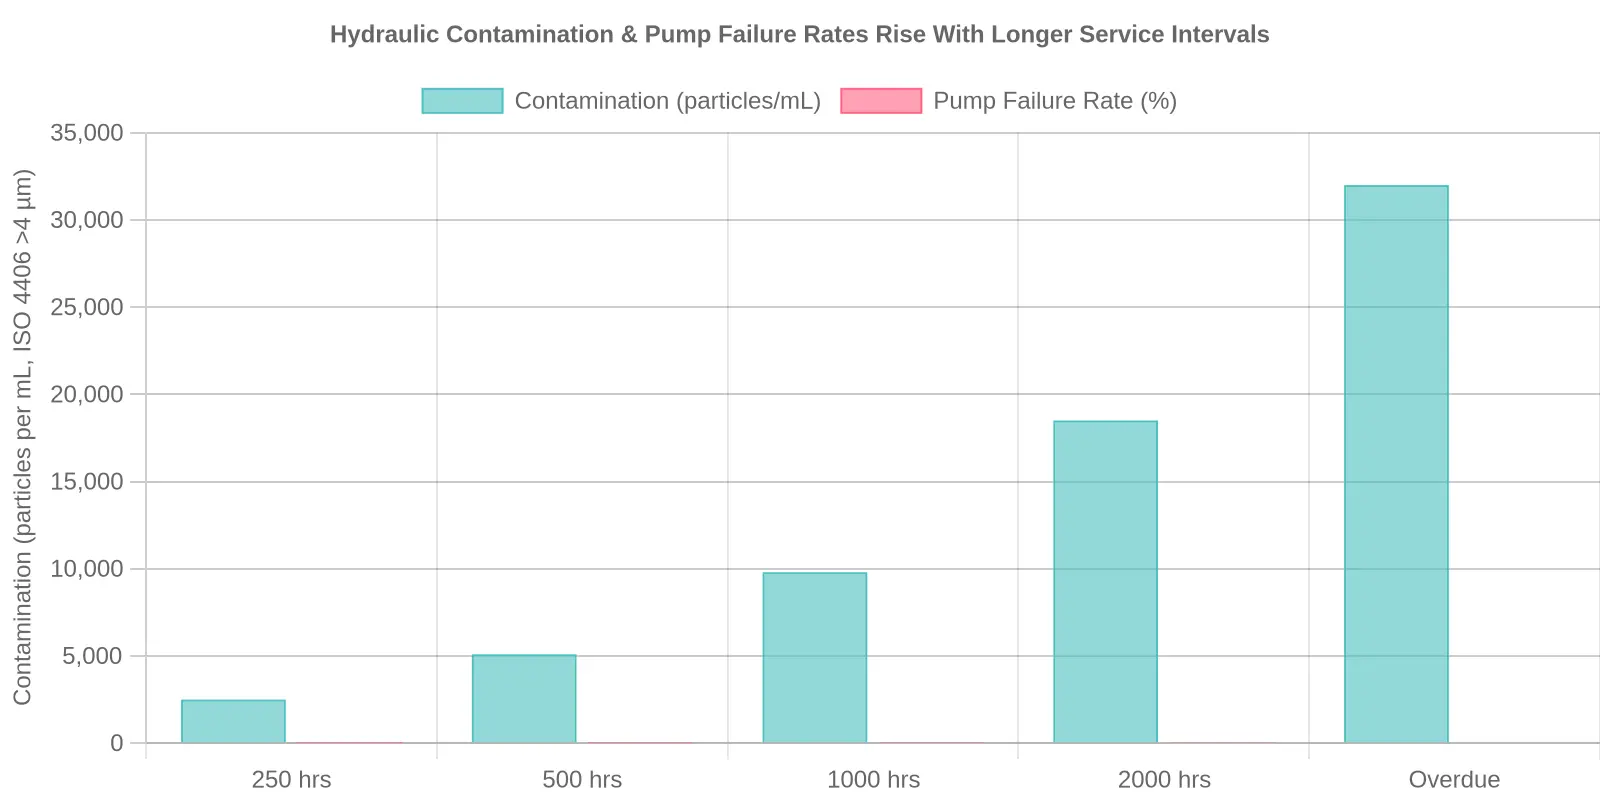
As service intervals stretch from 250 to 2000+ engine hours, contamination climbs from roughly 2,500 to 32,000 particles per mL and pump failure rates jump from 4% to 58%.
| Service Interval | Contamination (particles/mL, >4 µm) | Pump Failure Rate |
|---|---|---|
| 250 hrs | 2,500 | 4% |
| 500 hrs | 5,100 | 9% |
| 1000 hrs | 9,800 | 18% |
| 2000 hrs | 18,500 | 34% |
| Overdue (>2000 hrs) | 32,000 | 58% |
Every step up the interval ladder roughly doubles the contamination load, and once a machine drifts past its recommended service window, the numbers stop being academic. A hydraulic pump running on fluid loaded with abrasive particles grinds its own internal clearances down, film strength collapses, and heat spikes. A routine filter and fluid change turns into a scrapped pump and a parked machine.
That makes the service interval the most controllable lever you have over pump life. Filter and change fluid on schedule and the abrasive load is gone before it reaches the pump’s precision surfaces, keeping particle counts in a range the system was actually designed to survive.
Look at the trend on the chart and the failure curve bends upward. Catch contamination early at the 250 or 500-hour mark and you stay on the flat, cheap end of that curve. Ignore it and you ride it straight into the expensive one.
Root-Cause Tracing: Where Contamination Really Begins
When a hydraulic pump fails, the damage rarely starts at the pump itself. Trace the trail backward and it usually leads to earlier decisions about service intervals.
The Service Interval Connection
Every hydraulic system generates particles through normal wear, seal degradation, and heat cycling. Manufacturer-recommended service intervals exist to remove those contaminants before they reach critical concentrations. When operators skip or stretch these intervals, particle counts climb steadily. Debris that should have been drained away instead circulates through the pump, scoring bores, eroding precision clearances, and accelerating metal-to-metal contact.
Why Hydraulic Filter Efficiency Fades
Filters are consumables, not permanent barriers. As captured debris accumulates, hydraulic filter efficiency drops, and the bypass valve can open under pressure so unfiltered oil flows straight to sensitive components. The machine still runs, but it is quietly ingesting the very particles the filter was meant to trap.
Deferred Oil Changes Compound the Damage
Postponing an oil change compounds everything. Degraded fluid loses its ability to suspend and carry contaminants, additive packages deplete, and viscosity shifts. A pump already stressed by dirty oil gets less lubrication, so wear runs ahead of the calendar. A minor shortcut becomes a cascade: filter overload, elevated wear rates, eventual catastrophic failure. Disciplined service schedules are the cheapest insurance a pump has.
Preventing excavator hydraulic pump failures rarely comes down to one dramatic fix. It comes down to discipline, repeated every service interval. Use this list as a working reference, then apply it consistently.
- Follow the manufacturer’s service intervals. Treat the factory’s recommended hours as a hard minimum, not a loose suggestion. Internal pump wear accelerates sharply once oil and filters pass their replacement window.
- Perform regular oil analysis. Pull fluid samples at fixed intervals and track wear metals, viscosity, and additive levels so you can catch internal damage long before it becomes catastrophic.
- Replace filters on schedule. Install the correct OEM-grade filters at every service point and resist the temptation to stretch the interval to save a few dollars.
- Monitor particle counts. Use ISO cleanliness codes to confirm that hydraulic fluid contamination stays within the pump manufacturer’s target range, and act quickly if readings climb.
- Train operators. Teach your team to warm up the machine properly, avoid cold-start hammering, and report unusual noises or sluggish response the moment they appear.
- Install quality breathers. Upgrade to high-efficiency breathers that block dust and moisture from entering the reservoir. Airborne grit is a leading cause of pump scoring.
- Handle hydraulic fluid properly. Store oil in sealed, clean containers and use filtered transfer pumps so a top-off never introduces fresh dirt.
- Inspect seals, hoses, and connections. Check regularly for leaks, cracks, and loose fittings that allow air and contaminants to slip into the system and stress the pump.
None of these steps is glamorous, but together they put a shield around your excavator’s hydraulic pump. A preventive maintenance schedule that actually gets followed means oil analysis, filter changes, and particle-count monitoring happen before damage begins, not after a failure has grounded the machine. Keep contamination out at the source and abrasive particles stop grinding away at gear teeth, pistons, and bearings, so the pump holds its designed tolerances for far longer. Operators who understand the warning signs catch small issues early. Quality breathers keep airborne dirt out of the reservoir, and careful fluid handling keeps a top-off from adding more. The payoff is a longer-lasting pump, fewer breakdowns, lower repair costs, and more productive hours on the job site. When fluid stays clean and service intervals are respected, pumps can reach two or three times their expected service life. The habit does the work, not the reaction.
Follow the Symptom, Find the Root Cause
When an excavator starts losing hydraulic power, the pressure gauge tells you something is wrong but never tells you why. The flowchart below walks you from the first warning sign through a chain of inspections, so you can trace a creeping pressure drop back to the contamination that so often hides behind skipped service intervals.
![A minimal black-and-white line-art diagnostic flowchart moving top to bottom: it starts with a symptom box for low hydraulic pressure, branches through rectangular inspection step boxes covering fluid level, filter condition, oil sampling, and pump wear, passes through a diamond-shaped decision point that splits clean versus contaminated paths, and ends at a final root-cause box identifying contamination caused by service interval lapses.][image]
How to Read It
- Start at the top. The symptom box is your entry point. Low hydraulic pressure on a warm machine is the classic tell.
- Work each rectangular box in order. These are the inspection steps: verify fluid level, check the filter for loading, pull an oil sample, and look for scoring on the pump’s wear surfaces.
- Pause at the diamond. This decision point forces a simple verdict: is the oil clean, or has it gone dark and gritty?
- Land on the root cause. If contamination wins, the flowchart funnels you toward service interval lapses as the true culprit, not the pump itself, which is usually just the victim.
Keep this diagram in the service truck or taped inside the cab. Following the arrows takes minutes, yet it prevents the kind of guesswork that turns a routine filter change into a full pump replacement.
Where the Grit Actually Comes From
Before you blame bad luck or a “factory defect,” it helps to see how pump-killing contamination is really distributed. The doughnut chart below breaks down the relative contribution of each source to excavator hydraulic pump failures.
External dirt ingress (28%), service-related debris (22%), and fluid degradation from overdue fluid changes (16%) together account for roughly two-thirds of failures. All three are controllable, and all three trace back to how faithfully, or not, you respect your service intervals. The remaining sources, water and condensation (16%) and internal wear particles (18%), are far harder to eliminate outright and often get worse because intervals were stretched.
The dominant share of your failures isn’t random. It’s scheduled work you postponed.
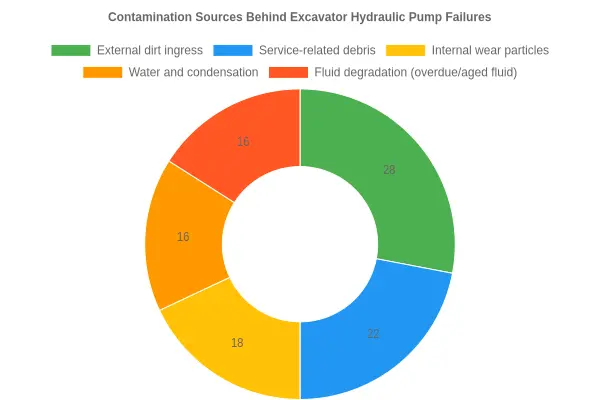
Figure: Controllable, service-interval-related sources (dirt ingress, service debris, and fluid degradation) dominate, adding up to about two-thirds of pump failures.
Frequently Asked Questions About Excavator Hydraulic Pump Failures
How often should excavator hydraulic oil be changed?
Most OEMs suggest a baseline of 1,000 to 2,000 operating hours, but that number assumes clean conditions and light duty. In dusty demolition or quarry work, real-world service intervals often need to be shorter. Follow your machine manual, then adjust based on oil analysis results.
What contamination level is dangerous for a hydraulic pump?
Pumps generally prefer oil at an ISO 4406 cleanliness of 18/16/13 or better. Once particle counts climb beyond roughly 21/19/16, abrasive wear accelerates sharply. Servo and piston pumps are especially sensitive to hard particles above 5 microns.
Can extending service intervals cause pump failure?
Yes. Stretching service intervals is one of the most common hidden causes of excavator hydraulic pump failures. As oil degrades, additive packages deplete and contaminants accumulate, grinding away at close-tolerance surfaces until the pump seizes or loses pressure.
What are the early warning signs of hydraulic fluid contamination?
Watch for sluggish response, overheating oil, unusual noise, dark or milky fluid, and metal glitter in the reservoir. A sudden drop in cycle speed or pressure often signals that hydraulic fluid contamination has already done damage.
How does oil analysis help prevent hydraulic pump failures?
Routine sampling tracks particle counts, water, and wear metals before problems escalate. It lets you set data-driven service intervals rather than guessing, catching hydraulic fluid contamination while repairs are still cheap and the machine is still on site.
Should I flush the system after a pump failure?
Absolutely. Replacing a failed pump without flushing the contaminated lines and reservoir just feeds debris into the new unit. A thorough flush, fresh filters, and clean oil protect your investment.
Fueling the Crew Between Repairs
An unplanned teardown usually means the maintenance team works straight through meals. Knowing where to grab a quick, filling bite nearby is a small logistics problem, but it matters on a long repair day. There is a well-regarded local option at Royal Buffet, and you can browse the full menu before the next breakdown rolls in. If you’re coordinating a crew across the region, these buffet options in Findlay, Ohio handle groups. Budget-conscious supervisors may also appreciate the senior menu pricing between shifts.
Conclusion: Predictable Failures, Preventable Costs
When you trace excavator hydraulic pump failures back to their source, the pattern rarely surprises. Contamination enters the system, service intervals get stretched, and wear builds quietly until a pump finally seizes mid-shift. Contaminated fluid attacks clearances, neglected service windows let abrasive particles circulate longer, and pump longevity collapses under the cumulative damage. Maintenance discipline breaks that chain.
Clean fluid and on-schedule service decide whether a pump lasts 4,000 hours or 12,000. Owners who treat oil analysis, filter changes, and sealed transfer practices as routine rather than reactive get more uptime and a lower total cost per operating hour.
Most hydraulic pump failures are predictable and largely preventable. Build contamination control into every refill, honor your service intervals, and monitor trends instead of waiting for symptoms. Start this week by auditing your fluid cleanliness and interval log, then hold that standard.